Quantcast
Channel: Oracle Blogs | Oracle Shay Shmeltzer's Blog
Viewing all 200 articles
Browse latest View live

Implementing the Tree Navigation Oracle Alta UI Design Pattern

$
0
0

The Oracle Alta UI design patterns offer many new approaches for navigation in your application as you can see in the navigation patterns section. One of those is the Tree Navigation pattern - which is an updated approach to the way that many applications display menus today.

While the "old" way of building these menus was using the tree component, the new design uses an interface that works better on mobile devices and is easier on the eyes. It uses animation to do in-place replacement of one level in the menu with the next one. 

oldnew
img

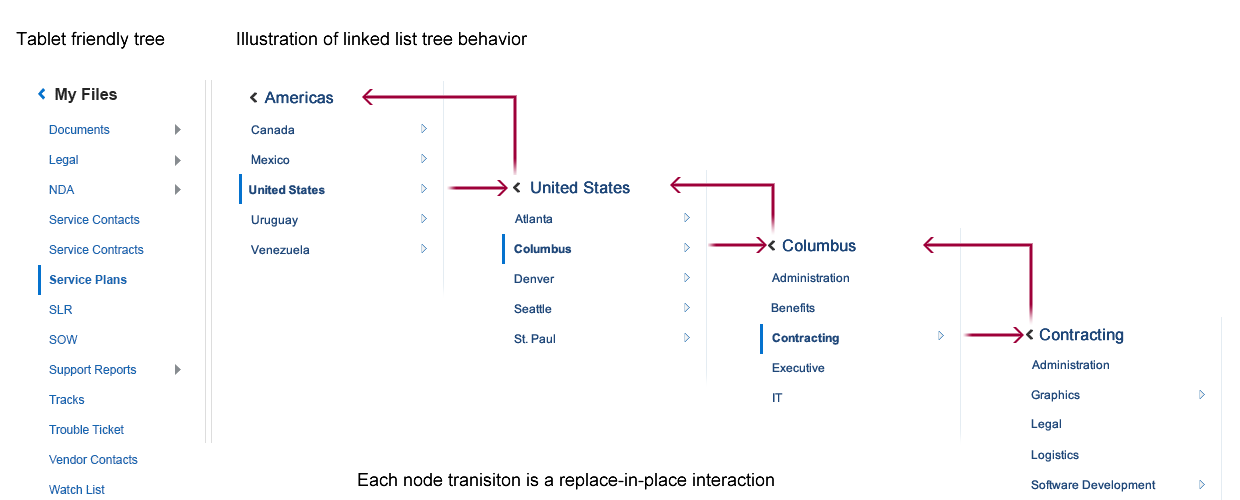
You could also use this approach to represent other types of hierarchical/master-detail relationships. 

In the demo below I show you how to quickly implement such navigation pattern with ADF Faces and a combination of af:listView components along with the af:deck component.

There are a bunch of further things you might want to do in your actual application beyond what the demo does.

One is to show on the right side of the page the information on the object you select on the left side. Using a deck component there you can also switch that section to show either Dept or Emp data in the same area. You'll already have the actionListener in place to do the switch of display, and ADF already has the right record selected - so just dropping the same data control on the right as a form will be enough.

Another nice enhancement would be to condition the showing of the right caret to be based on whether there are actually details. This should be easy to achieve with a calculated attribute using groovy - as shown here

In the demo I also show how to invoke the makeCurrent row selection functionality from a managed bean, this allows me to do two operations when a menu option is selected. The code I use ,which is based on code I found on Ashish's blog, is:

public void deptSelect(SelectionEvent selectionEvent) {        ELContext elcontext = FacesContext.getCurrentInstance().getELContext();        MethodExpression methodExpression =            FacesContext.getCurrentInstance().getApplication().getExpressionFactory().createMethodExpression(elcontext,                                                "#{bindings.DepartmentsView1.treeModel.makeCurrent}",                                                                                                             Object.class, new Class[] {                                                                                                             SelectionEvent.class });        methodExpression.invoke(elcontext, new Object[] { selectionEvent });        deck.setDisplayedChild("pgl2");        AdfFacesContext.getCurrentInstance().addPartialTarget(deck);    } 

I also use styleClass="AFAppNavbarButton" for the "back" button to make it look a bit better. 

The full source of the JSF page is:

<?xml version='1.0' encoding='UTF-8'?><!DOCTYPE html><f:view xmlns:f="http://java.sun.com/jsf/core" xmlns:af="http://xmlns.oracle.com/adf/faces/rich">    <af:document title="untitled3.jsf" id="d1">        <af:messages id="m1"/>        <af:form id="f1">            <af:pageTemplate viewId="/oracle/templates/tabletFirstTemplate.jspx" id="pt1">                <f:facet name="header"/>                <f:facet name="status"/>                <f:facet name="appNav"/>                <f:facet name="globalLinks"/>                <f:facet name="footer"/>                <f:facet name="center"/>                <f:facet name="start">                    <af:deck id="d2" binding="#{mb3.deck}" displayedChild="pgl1">                        <af:panelGroupLayout id="pgl1">                            <af:listView value="#{bindings.DepartmentsView1.collectionModel}" var="item"                                         emptyText="#{bindings.DepartmentsView1.viewable ? 'No data to display.' : 'Access Denied.'}"                                         fetchSize="#{bindings.DepartmentsView1.rangeSize}" id="lv1" selection="single"                                         selectionListener="#{mb3.deptSelect}">                                <af:listItem id="li1">                                    <af:panelGridLayout id="pgl3">                                        <af:gridRow marginTop="5px" height="auto" marginBottom="5px" id="gr1">                                            <af:gridCell marginStart="5px" width="80%" id="gc1">                                                <af:outputFormatted value="#{item.bindings.DepartmentName.inputValue}"                                                                    id="of1"/>                                            </af:gridCell>                                            <af:gridCell marginStart="5px" width="20%" marginEnd="5px" id="gc2">                                                <af:image source="func_caretright_16_ena.png" id="i1"/>                                            </af:gridCell>                                        </af:gridRow>                                    </af:panelGridLayout>                                </af:listItem>                            </af:listView>                        </af:panelGroupLayout>                        <af:panelGroupLayout id="pgl2">                            <af:button text="#{bindings.DepartmentName.inputValue}" id="b1"                                       actionListener="#{mb3.backToDept}" styleClass="AFAppNavbarButton"                                       icon="/func_caretleft_16_ena.png"/>                            <af:listView value="#{bindings.EmployeesView4.collectionModel}" var="item"                                         emptyText="#{bindings.EmployeesView4.viewable ? 'No data to display.' : 'Access Denied.'}"                                         fetchSize="#{bindings.EmployeesView4.rangeSize}" id="lv2">                                <af:listItem id="li2">                                    <af:panelGridLayout id="pgl4">                                        <af:gridRow marginTop="5px" height="auto" marginBottom="5px" id="gr2">                                            <af:gridCell marginStart="5px" width="80%" id="gc3">                                                <af:outputFormatted value="#{item.bindings.LastName.inputValue}"                                                                    id="of2"/>                                            </af:gridCell>                                            <af:gridCell marginStart="5px" width="20%" marginEnd="5px" id="gc4">                                                <af:image source="func_caretright_16_ena.png" id="i2"/>                                            </af:gridCell>                                        </af:gridRow>                                    </af:panelGridLayout>                                </af:listItem>                            </af:listView>                        </af:panelGroupLayout>                        <af:transition triggerType="forwardNavigate" transition="slideLeft"/>                        <af:transition triggerType="backNavigate" transition="slideRight"/>                    </af:deck>                </f:facet>                <f:facet name="end"/>                <f:attribute name="endWidth" value="0px"/>                <f:attribute name="startWidth" value="200px"/>            </af:pageTemplate>        </af:form>    </af:document></f:view> 


Dynamically refresh a part of a page (PPR) in Oracle MAF

$
0
0

A common question for developers who are just starting with Oracle MAF, especially if they have a background in Oracle ADF, is how do you do a partial page refresh in Oracle MAF.

Partial Page Refresh basically means that I want to change something in my UI based on another event in the UI - for example hide or show a section of the page. (In ADF there is a partialTrigger property for components which is not there in MAF).

In MAF the UI behaves differently - it is not based on JSF after all - the UI directly reflects changes in managed beans as long as it knows about changes there. How does it know about changes? For this you need to enable firing change event notifications. This is actually quite easy to do - just turn on the checkbox in JDeveloper's accessors generation and it will do the job for you.

Here is a quick demo showing you how to achieve  this:

Here is the code used.

in AMX page:

     <amx:tableLayout id="tl1">

      <amx:rowLayout id="rl1">

        <amx:cellFormat id="cf2">

          <amx:listView var="row" showMoreStrategy="autoScroll" bufferStrategy="viewport" id="lv1">

            <amx:listItem id="li1">

              <amx:outputText value="ListItem Text" id="ot2"/>

              <amx:setPropertyListener id="spl1" from="#{'true'}" to="#{viewScope.backingPPR.showIt}"

                                       type="swipeRight"/>

              <amx:setPropertyListener id="spl2" from="#{'false'}" to="#{viewScope.backingPPR.showIt}"

                                       type="swipeLeft"/>

            </amx:listItem>

          </amx:listView>

        </amx:cellFormat>

      </amx:rowLayout>

      <amx:rowLayout id="rl2" rendered="#{viewScope.backingPPR.showIt}">

        <amx:cellFormat id="cf1">

          <amx:commandButton text="commandButton1" id="cb3"/>

        </amx:cellFormat>

      </amx:rowLayout>

    </amx:tableLayout>


in managed bean:

     boolean showIt = false;


    public void setShowIt(boolean showIt) {

        boolean oldShowIt = this.showIt;

        this.showIt = showIt;

        propertyChangeSupport.firePropertyChange("showIt", oldShowIt, showIt);

    }


    public boolean isShowIt() {

        return showIt;

    }


    public void addPropertyChangeListener(PropertyChangeListener l) {

        propertyChangeSupport.addPropertyChangeListener(l);

    }


    public void removePropertyChangeListener(PropertyChangeListener l) {

        propertyChangeSupport.removePropertyChangeListener(l);

    }


Using the Oracle Developer Cloud Service for Git version management for JDeveloper/ADF apps

$
0
0

The Oracle Developer Cloud Service (DevCS for short) provides a complete cloud-hosted development platform for your team. This makes it very easy to start adopting development best practices for your team, and adopt a more agile development approach.

If you haven't tried it yet, you should!

It's simple to get a free trial instance - just sign up for a trial of the Java cloud service (which, by the way, will take you through anOracle ADF based registration wizard) and an instance of the Developer cloud service will be provisioned for you as part of the trial. No need for any additional machines or installations on your side.

I'm going to write a couple of blogs about the various features that DevCS provides such as build and continuous integration, but let's start with the very basic feature we all should be using - source code management.

Every project needs to do version management - even if you are a single developer - and with DevCS there is no server and network setup required. Create a new DevCS project and 10 seconds later you have your git server accessible from any computer that has internet access.

The demo below is using JDeveloper 12.1.3 and the sample summit ADF application that you can get from OTN. 

In the demo I start from scratch and demo how to

  • create a new DevCS project
  • check code into the git repository
  • branch my code to work on fixes
  • submit the changes back
  • how to do code review by team members
  • merge fixes to the master branch


Go ahead try it out with your project and your team.

If you are new to git (which has quickly became the new standard for source management) - check out the Oracle A-Team blog entry that explains a good workflow for team work with git that you can adopt. 

Have any further questions about using the Developer Cloud Service? Ask them on the DevCS community page

Oracle Developer Cloud Service - Automating Builds for Oracle ADF Applications

$
0
0

Following up on the previous blog that showed how to get your ADF application into the Developer Cloud Service git repository, this entry will show you the next step in the lifecycle - executing builds.

The Oracle Developer Cloud Service (DevCS) supports build automation with both Maven and Ant scripts - and in this demo I'm showing you how to use the Ant option. One of the unique aspects of DevCS for customers who are  using Oracle ADF and JDeveloper is that the cloud comes pre-configured with the ADF libraries needed to compile your code, and also with support for OJDeploy so you can leverage deployment profiles that you defined for your application.

In fact DevCS comes with support for two ADF versions - 11.1.1.7.1 and 12.1.3 (as of the time of this blog).

In the video below you'll see

  • How to add a build file for your ADF application
  • How to  configure the build file to work in the cloud environment
  • How to define a build job and execute it
  • How to look at the log files for the build job
  • How to automate the build execution to happen when changes are committed to the git repository

The build in the example above just does the packaging, but in more realistic scenarios you can use similar build processes to create ADF libraries from projects, automate testing, modify configuration and more.

There are a couple of files that are used in the demo that you might want to use in your implementation:

The build.xml file: 

<property environment="env"/><property file="build.properties"/><target name="deploy" description="Deploy JDeveloper profiles"><taskdef name="ojdeploy"
             classname="oracle.jdeveloper.deploy.ant.OJDeployAntTask"
             uri="oraclelib:OJDeployAntTask"
             classpath="${oracle.jdeveloper.ant.library}"/><ora:ojdeploy xmlns:ora="oraclelib:OJDeployAntTask"
                  executable="${oracle.jdeveloper.ojdeploy.path}"
                  ora:buildscript="${oracle.jdeveloper.deploy.dir}/ojdeploy-build.xml"
                  ora:statuslog="${oracle.jdeveloper.deploy.dir}/ojdeploy-statuslog.xml"><ora:deploy><ora:parameter name="workspace"
                       value="${oracle.jdeveloper.workspace.path}"/><ora:parameter name="profile"
                       value="${oracle.jdeveloper.deploy.profile.name}"/><ora:parameter name="nocompile" value="false"/><ora:parameter name="outputfile"
                       value="${oracle.jdeveloper.deploy.outputfile}"/></ora:deploy></ora:ojdeploy></target>

The build.properties file I used can be found here.

The mask for the build automatic execution is */1 * * * *

Note that in the properties file there are references to environment variables that you will need to change if you are looking to deploy an 11.1.1.* app - specifically the options for 12 and 11 are:

WLS_HOME_12C3=/opt/Oracle/Middleware12c3/wlserver
WLS_HOME_11G=/opt/Oracle/Middleware/wlserver_10.3
MIDDLEWARE_HOME_12C3=/opt/Oracle/Middleware12c3
MIDDLEWARE_HOME_11G=/opt/Oracle/Middleware
ORACLE_HOME_12C3=/opt/Oracle/Middleware12c3/jdeveloper
ORACLE_HOME_11G=/opt/Oracle/Middleware/jdeveloper

Leveraging Icon Fonts (Font Awesome) in Oracle ADF - 500 New Icons for your app

$
0
0

Icon fonts are a growing trend among web developers, they make it quite simple to add icons to your web site and resize them for better responsive design.

Font Awesome is a popular open source icon font - providing over 500 icons that you can add to your application. I got several questions over the past couple of weeks about using these icons in ADF applications, so here is a short video showing you how to set this up with ADF 12.1.3 and using skins. (Quick note - before 12.1.3 you couldn't include these type of font in the skin css file - and you would have needed to directly refer to the CSS file from each page in your app - one more reason to upgrade your application to 12.1.3).

The basic steps:

  • Create a new skin for your ADF application (if you don't know how to do this, see this blog entry).
  • Download font awesome and copy the font-awesome-4.3.0 directory into your new skin directory
  • Copy the @font-face entry from the font-awesome.min.css file into your new skin.css file
  • Update the path in the various URI entries so it reflects the new relative location of the font files
  • Create class entries in your skin CSS for the icons you want to use - remember to add a font-family: FontAwesome; to make sure they use the new font.
  • Assign the classes to the styleclass property of your ADF Faces components.

Here is a demo showing how it is set up and how it works:

The skin1.css in the video is this:

@charset "UTF-8";

/**ADFFaces_Skin_File / DO NOT REMOVE**/

@namespace af "http://xmlns.oracle.com/adf/faces/rich";

@namespace dvt "http://xmlns.oracle.com/dss/adf/faces";

@font-face {

    font-family: 'FontAwesome';

    src: url('font-awesome-4.3.0/fonts/fontawesome-webfont.eot?v=4.3.0');

    src: url('font-awesome-4.3.0/fonts/fontawesome-webfont.eot?#iefix&v=4.3.0')format('embedded-opentype'), url('font-awesome-4.3.0/fonts/fontawesome-webfont.woff2?v=4.3.0')format('woff2'), url('font-awesome-4.3.0/fonts/fontawesome-webfont.woff?v=4.3.0')format('woff'), url('font-awesome-4.3.0/fonts/fontawesome-webfont.ttf?v=4.3.0')format('truetype'), url('font-awesome-4.3.0/fonts/fontawesome-webfont.svg?v=4.3.0#fontawesomeregular')format('svg');

    font-weight: normal;

    font-style: normal;

}

.heart:before {

    content: "\f004";

    font-family: FontAwesome;

}

.mail:before {

    content: "\f003";

    font-family: FontAwesome;

If you want to see how this could help with responsive design try this in your CSS as an example. Then resize the width of the browser window to see how the icons will change their size dynamically:

.heart:before {

    content: "\f004";

    font-family: FontAwesome;

    font-size: x-large;

}

.mail:before {

    content: "\f003";

    font-family: FontAwesome;

    font-size: x-large;

}

@media screen and (max-width:950px) {

    .heart:before {

        content: "\f004";

        font-family: FontAwesome;

        font-size: small;

    }

    .mail:before {

        content: "\f003";

        font-family: FontAwesome;

        font-size: small;

    }

Leveraging Oracle Developer Cloud Service in SQL and PL/SQL Projects - lifecycle and team collaboration

$
0
0

Usually my demos are targeted at Java developers, but I realize that a lot of developers out there are not using Java, for example in the Oracle install base there is a huge section of PLSQL developers. This however doesn't change their requirements from a development platform. They can still benefit from version management and code review functionality. They still need to track bugs/issues and requirements from their users, and they still need to collaborate in a team environment. 

So I decided to try out and see what would be the development lifecycle experience for a PL/SQL developer if they'll leverage the services provided by the Oracle Developer Cloud Service - here is a demo that shows a potential experience. 

What you'll see in the demo:

  • Using JDeveloper to create DB Diagrams, Tables and PL/SQL code
  • Version manage PL/SQL and SQL with Git
  • Defining a cloud project and adding users
  • Check code in, and branch PL/SQL functions
  • Tracking tasks for developers
  • Code review by team members
  • Build automation (with Ant) - and almost a deploy to the DB

As you can see it is quite a nice complete solution that is very quick to setup and use.

It seems that the concepts of continuous integration in the world of PL/SQL development are not yet a common thing. In the demo I use the Ant SQL command to show how you could run a SQL script you created to create the objects directly in the database - which is probably the equivalent of doing a deployment in the world of Java. However if you prefer you can use Ant for example to copy files, zip them, or do many other tasks such as run automated testing frameworks.

The Ant task I used is this:

  <path id="antclasspath">    <fileset dir=".">      <include name="ojdbc7.jar"/>    </fileset>  </path>   <target name="deploy">    <sql driver="oracle.jdbc.OracleDriver" userid="hr2" password="hr"         url="jdbc:oracle:thin:@//server:1521/sid" src="./script1.sql"classpathref="antclasspath"/>  </target> 

I had both the ojdbc7.jar file and the script file at the root of the project for convenience. 

While my demo uses JDeveloper - you should be able to achieve similar functionality with any tool that supports Git. In fact if you rather not use a tool you can simply use command lines to check your files directly into the cloud.

Hot Deployment in JDeveloper 12c - Don't Stop/Start Your App

$
0
0

Old habits are hard to get rid off, and I still see long time users of JDeveloper (and also many new users) who are stopping/starting their application on the embedded WebLogic each time that they make a change or addition to their code.

Well you should stop it! (I mean stop stopping the application).

For a while now, JDeveloper has support for hot deployment that means that when you do most of the changes to your code you just need to do save-all followed by a rebuild of your viewController project - and that's it.

You can then go to your browser and reload your page - and the changes will be reflected there.  This will not only save you the time it takes to undeploy and redeploy your app, it will also reduce the amount of memory you use since frequent redeployment of the app on the embedded WebLogic leads to bigger memory consumption.

In the demo below I use JDeveloper 12.1.3 to show you that I can just do the save->rebuild and pick up:

  • Changes in the JSF file
  • Changes to the JSF configuration file adfc-config.xml
  • New classes that are added to both the model and viewController projects
  • Changed to the ADF configuration files (pagedefs, data binding, data controls)

So for most cases, you should be covered with this hot-deployment capability.

There are some cases that will require a redeploy of the application (for example if you add a new skin css file, or if you change some runtime configuration of your app in web.xml) but for most cases you don't need to continue with the stop/start habit.

OOW and JavaOne 2015 - Where I'll Be

$
0
0

It's that time of the year again, and next week is going to be crazy busy for us at Oracle OpenWorld and at JavaOne.

In case you want to catch me, here is a list of the locations where I'll be:

Building iOS Apps with Java 8 [CON1588]

Monday, Oct 26, 12:30 p.m. | Hilton—Continental Ballroom 4

Build Responsive Web Applications with Oracle ADF [HOL10380]

Monday, Oct 26, 5:00 p.m. | Hotel Nikko—Nikko Ballroom III (3rd Floor)

General Session: Revolutionizing Application Development with Oracle Cloud [GEN9500]

 Tuesday, Oct 27, 11:00 a.m. | Moscone South—103 

Meet the Experts: Oracle’s Development Tools and Frameworks [MTE10022]

Tuesday, Oct 27, 6:15 p.m. | Moscone South—300

Oracle Application Development Framework and Oracle JDeveloper—What’s New and How to Use It [CON8333]

Wednesday, Oct 28, 1:45 p.m. | Moscone South—304

Building iOS Apps with Java 8 [CON1588]

Thursday, Oct 29, 9:00 a.m. | Hilton—Continental Ballroom 1/2/3

Moving Oracle ADF to the Cloud—Development and Deployment in the New Age [CON8332]

Thursday, Oct 29, 1:15 p.m. | Moscone South—270

In between you could also catch me at the Oracle demo ground in Moscone south (mostly in the Oracle Application Builder Cloud Service), and at the JavaOne GeekBar on Monday.

At the rest of the time, I'll try and catch some of the sessions on this list.

See you there...


Introducing the Masonry Layout in Oracle ADF 12.2.1

$
0
0

One of the focus areas for Oracle ADF 12.2.1 was simplifying the creation of responsive UIs, and one of the new components that supports this is the af:masonryLayout component. It allows you to define areas on your page that act as tiles and automatically re-arrange themselves to match the browser's window size.

This layout is very useful for dashboard type of pages where you are showing all sorts of information. 

In the video below I show you the very basic way to use this out of the box.

As mentioned in the video there are built in styleClasses in ADF for the size of masonry tiles.

They are in the format of AFMasonryTileSize1x1 with support for 1x2,1x3,2x1,2x2,3x1,3x2

The Masonry Layout can contain any component you want (not just group layout as shown in the page), as long as you give that component the right AFMasonryTileSize style. 

You can further control the sizing and coloring of the tiles using styleClasses that you define in a skin file.

For example in the video I used the following style to make sure you can actually see the panelGroupLayout tiles on the page. 

.tileStyle{
background-color:gray;
border: black;
border-width: 2px; 
} 

The actual code in the JSF page is:

<af:masonryLayout id="ml1"><af:panelGroupLayout id="pgl1" styleClass="AFMasonryTileSize2x1 tileStyle"/><af:panelGroupLayout id="pgl2" styleClass="AFMasonryTileSize2x1 tileStyle"/><af:panelGroupLayout id="pgl3" styleClass="AFMasonryTileSize1x1 tileStyle"/><af:panelGroupLayout id="pgl4" styleClass="AFMasonryTileSize3x1 tileStyle"/></af:masonryLayout>

Responsive UI in Oracle ADF 12.2.1 with the MatchMediaBehavior Tag

$
0
0

Another very powerful addition to the responsive capabilities of ADF Faces in version 12.2.1 is the new af:matchMediaBehavior tag. It allows you to control almost every bit of your UI and change properties in response to changes in the viewport size.

Check out what it can do in this video:

Note that in the mediaQuery you can use other type of CSS media queries

The code for the page in the demo is

       <af:panelSplitter id="ps1" orientation="horizontal" splitterPosition="201">                <f:facet name="first">                    <af:panelFormLayout id="pfl1" labelAlignment="start">                        <af:matchMediaBehavior matchedPropertyValue="top" propertyName="labelAlignment"                                               mediaQuery="screen and (max-width: 768px)"/>                        <af:inputText label="Label 1" id="it1"/>                        <af:inputText label="Label 2" id="it2"/>                        <f:facet name="footer"/>                    </af:panelFormLayout>                </f:facet>                <f:facet name="second">                    <af:panelFormLayout id="pfl2" labelAlignment="start" rows="2">                        <af:matchMediaBehavior matchedPropertyValue="top" propertyName="labelAlignment"                                               mediaQuery="screen and (max-width: 900px)"/>                        <af:matchMediaBehavior matchedPropertyValue="4" propertyName="rows"                                               mediaQuery="screen and (max-width: 800px)"/>                        <af:inputText label="Label 1" id="it3"/>                        <af:inputText label="Label 2" id="it4"/>                        <f:facet name="footer"/>                        <af:inputListOfValues label="Label 1" popupTitle="Search and Result Dialog" id="ilov1"/>                        <af:inputFile label="Label 1" id="if1"/>                    </af:panelFormLayout>                </f:facet>                <af:matchMediaBehavior matchedPropertyValue="vertical" propertyName="orientation"                                       mediaQuery="screen and (max-width: 768px)"/>                <af:matchMediaBehavior matchedPropertyValue="100" propertyName="splitterPosition"                                       mediaQuery="screen and (max-width: 768px)"/>            </af:panelSplitter>     

REST based CRUD with Oracle ADF Business Components

$
0
0

A key new feature in Oracle ADF 12.2.1 is the ability to expose ADF Business Components through REST/JSON interfaces.

REST/JSON is the preferred interface for many client side UI technologies to access remote backend services - as examples both Oracle JET and Oracle MAF leverage REST as the way to access data from remote servers. 

Oracle ADF makes it very simple to expose your existing business components as REST services - all through a declarative set of dialogs.

Once you published the service interface for a view object, you should be able to do the full set of CRUD operation on that object through different REST action:

GET - will do a Read

POST - will do a Create

PATCH - will do an Update

DELETE - will do a Developer

One thing that you'll want to verify is that when you are passing JSON data back into the REST interface you specify in the header that:

Content-Type is application/vnd.oracle.adf.resourceitem+json

otherwise you'll get an error along the lines of:

oracle.adf.internal.model.rest.core.exception.CannotParseContentException: The content type is not a ADFm REST entity. Content-Type: text/plain 

In the video below I show very quickly how to expose a REST interface and then how to invoke all the CRUD operations directly from the chrome app "Postman". 

These new feature can make your Oracle ADF business services part of any new application that prefers to use REST/JavaScript/HTML5 type of architecture.

Read more about exposing Oracle ADF BC as REST in the documentation

Remote TaskFlows/Remote Region - For Advanced Reusability in Oracle ADF

$
0
0

A new feature in Oracle ADF 12.2.1 is Remote TaskFlows (or Remote Regions) - this allows one application to have regions inside it that are populated from taskflows that are running as part of another application.

Initially some of you might be a bit confused - "wasn't this something that we were able to do with ADF libraries already? We could just package a taskflow from one app as an ADF library and use that library in the other application".

The slight distinction here is that the library approach had the taskflow running as part of your consuming application. Remote task flows on the other hand have the taskflow running as part of the other application and don't require the creation of a library. As a result they also don't require an ADF library update when the taskflow changes- the minute the changes are deployed on the remote server, your application will get the new version. 

One way of thinking about remote taskflows is as adding a "portal" like functionality to your ADF app - allowing one app to display parts of another app leveraging the other app resources for executing any logic. 

Here is a quick video demoing how to configure and run this.

The URLs you'll need for creating the remote region resource connection are:

http://yourserver:port/your-context-root/rtfquery

and

http://yourserver:port/your-context-root/rr

Note that there are some limitation on the type and functionality of taskflows that can be exposed as remote taskflows. And there are other things to consider such as security and session timeout settings. So have a read through the remote region documentation before you start leveraging this feature.

A couple of notes.

1. In the currently available 12.2.1 version of JDeveloper from OTN, there is a slight bug that will prevent you from creating the connection to the remote task flow - there is a patch available for this from Oracle Support - request the patch for bug 22132843 or 22093099.

2. At my OOW session about new features I mentioned that remote task flows are loaded in parallel, that is actually still not the case, while we started work on this capability - it didn't made it into 12.2.1. So remote task flows behave like other task flows and load in sequential way right now. 

Enabling CORS for ADF Business Component REST Services

$
0
0

CORS (which stands for Cross-Origin Resource Sharing) is a setting that will enable your REST services running on one server to be invoked from applications running on another server.

I first encountered this when I was trying to run an Oracle JET project in my NetBeans IDE that will access a set of REST services I exposed using Oracle ADF Business Component in my JDeveloper environment. Since NetBeans runs the HTML on a GlassFish instance, while JDeveloper ran the ADF BC layer on a WebLogic instance I got the dreaded No 'Access-Control-Allow-Origin' header is present error:

 XMLHttpRequest cannot load http://127.0.0.1:7101/Application14-RESTWebService-context-root/rest/1/dept/20. No 'Access-Control-Allow-Origin' header is present on the requested resource. Origin 'http://localhost:8383' is therefore not allowed access.

There is no built-in functionality to enable CORS for ADF BC in JDeveloper, but I found it very easy to leverage the CORS Filter libraries to do this. All you need to do is add the two JAR files it provides to your project and configure the web.xml to support the filter and the specific REST operations you want to enable CORS for.

Here is a quick video showing you the complete setup (using the REST ADF BC project created here).

The web.xml addition is:

   <filter>    <filter-name>CORS</filter-name>    <filter-class>com.thetransactioncompany.cors.CORSFilter</filter-class>            <init-param>                <param-name>cors.supportedMethods</param-name>                <param-value>GET, POST, HEAD, PUT, PATCH, DELETE</param-value>        </init-param>  </filter>  <filter-mapping>    <filter-name>CORS</filter-name>    <url-pattern>/*</url-pattern>  </filter-mapping>

If you follow my approach in the video and add the JARs as a new user library to JDeveloper and don't forget to check the "Deploy by Default" check box for the library.

Doughnut Chart - a Yummy Addition to Oracle ADF Faces

$
0
0

Another new feature in Oracle ADF 12.2.1 is the new Doughnut Chart capability.

It looks like this:

When I first tried to create this one, I couldn't find the option for doughnut chart in the JDeveloper wizard.

Then I was told that a doughnut is just a pie with a hole in the center - so you actually just need to create a pie chart, and then specify some properties.

And indeed, if you'll look at the property inspector for pie charts you'll see a few new properties you can leverage. 

For example there is the InnerRadius property - that expects a value between 1 and 0 - this controls how big is the hole in your doughnut.

Another nice capability is the you can put some filling in your doughnut - basically put some text that will go in the middle empty area. You do this by using centerLabel property. In the example above I used the center of the doughnut to report the total salary of a department - using a groovy sum expression in the Departments ViewObject - learn how here.

(Don't forget to use the centerLabelStyle property to assign it a bigger font - a best practice from the Oracle Alta UI book).

Here is the code from the JSF page:

<dvt:pieChart selectionListener="#{bindings.EmployeesView4.collectionModel.makeCurrent}"
   dataSelection="single" id="pieChart1" var="row"
   value="#{bindings.EmployeesView4.collectionModel}"
   centerLabel="Total Salary: #{bindings.SumSalary.inputValue}" innerRadius="0.7"
   centerLabelStyle="font-size:large;" title="Salary BreakDown"
   sliceLabelPosition="inside"><dvt:chartLegend id="cl1" position="bottom"/><dvt:pieDataItem id="di1" label="#{row.LastName}" value="#{row.Salary}"/></dvt:pieChart>

Try it out - it's a yummy new addition to Oracle's set of bakery based charts. 

Developing with Oracle MAF and Oracle ADF Business Components - The REST Edition

$
0
0

When Oracle ADF Mobile was released over 3 years ago, one of the first blogs I created on this topic showed how to leverage Oracle ADF Business Components to access a server database and create a mobile front end on top of it.

Since then both frameworks have matured, and we learned some best practices doing implementations internally and for customers. Today I'm going to show you a better way to build this type of applications, specifically leveraging REST as the communication protocol between the ADF backend and the Oracle MAF front end. REST based integration performs much better than SOAP for this mobile scenario, and as you'll see development is as simple.

Specifically I'm leveraging the Oracle A-Team Mobile Persistence Accelerator (AMPA) JDeveloper Extension- this extension simplifies MAF's interacting with REST backends, and has some cool extra features if your  REST services are based on ADF BC.

I used JDeveloper 12.2.1 to expose REST services from my ADF Business Components.  If you are not familiar with how to do that, see this blog on exposing ADF BC as REST services, and then this blog about enabling CORS for ADF Business Components.

The video below picks up the same application (Application14) and continues from where the previous two ended. 

Now let's see the MAF development part:

As you can see, it is quite easy to create your MAF UI. The AMPA extension does a lot of work for you making the access to the REST backend as easy as possible. (thanks goes out to Steven Davelaar).

The AMPA extension can also generate a complete UI for you - so you can give that wizard a try to if you are  looking for even more productivity. 


Agile Development with Oracle Developer Cloud Service and JDeveloper 12.2.1

$
0
0

I blogged in the past about using Oracle Developer Cloud Service (DevCS) together with JDeveloper/ADF to manage your code and automate your builds.

Since I wrote those blog entries, we released a new version of JDeveloper (12.2.1) that added deeper integration with the Developer Cloud Service functionality for tracking tasks/issues. In parallel Developer Cloud Service also added various features with one of the new areas being covered is managing sprints and an agile development processes

I thought it might be interesting to show some of the new features of both products working togethers.

In the video below you'll see how to:

  • Connect to DevCS and its projects from inside JDeveloper
  • Leverage the Team view in JDeveloper (tasks, builds, and code repositories)
  • Interact with Tasks/Issues in JDeveloper
  • Handle Git transactions
  • Associate code commits with specific tasks
  • Monitor team activity in the Team Dashboard
  • Create Agile boards and manage sprints in Developer Cloud Service

One other interesting feature I'm not showing above is the ability to do code reviews on your code by team members - before those are merged into your main code line.

If you want to try Developer Cloud Service out, just get a trial account of the Oracle Java Cloud Service - and you'll get an instance of the Developer Cloud Service that you can use to test this new way of working. 

First Steps with Oracle Application Builder Cloud Service

$
0
0

Last week we released a new cloud service - the Oracle Application Builder Cloud Service.

(I'll refer to is as ABCS here to keep it short).

ABCS is built for the non-professional developer, what some call the citizen developer, giving them a solution to very quickly build and publish applications that can address immediate business needs. As you'll see in the demo below, a UI first approach makes development very simple.

I recorded a quick demo to show you just the basics of app development and wet your appetite.

As you'll see ABCS makes it dead simple to create Web apps, define business objects that you want to track (implemented as tables in an Oracle cloud database instance), and fine tune the UI creating multiple forms. The underlying UI technology of both ABCS and the apps that it creates is Oracle JET. 

Note that in this video I didn't cover the steps to actually stage and then publish your application so other users can access it - another thing that ABCS makes simple. On these and other capabilities in future blogs...

Application Builder Cloud Service - Menus, Buttons and Validation

$
0
0

Continuing with the exploration of Oracle Application Builder Cloud Service, I've picked up the application I created in the previous blog entry and added a few more things to demo how to:

  • Configure the logo and title
  • Modify and add menu items
  • Define field level validation
  • Add buttons and define their actions

Check out this short demo:

OTN Interview about Application Development with Oracle

$
0
0

A few weeks ago, I set down with Bob from OTN for an interview that covered some of the key products our group works on.

I covered the various frameworks (ADF, JET, MAF), what we are doing with cloud based development (DevCS) and our tools for citizen developers (ABCS).

In case you are interested in any of these acronyms here is the video:

Note that things move really fast at Oracle, and since this interview we already released a new version of Oracle JET and also made it open source, we released an update to Developer Cloud Service, and Application Builder Cloud Service has gone production.

Calling REST Services from Application Builder Cloud Service

$
0
0

One of the frequent requests we get when we demo ABCS is - can I invoke some external functionality that is exposed as a REST service and pass parameters to it.

Well, with a minimal amount of JavaScript coding you can do it in the current version. 

I recorded the demo below that shows you how to do that.

I'm leveraging a public REST API that github exposes to get a list of repositories for a user. The service is available at https://api.github.com/users/oracle/repos

I then design an ABCS page that has a parameter field, a button that invokes the REST/JSON call, and a placeholder for results. It looks like this: 

In addition the video also shows some other techniques that are useful, including:

  • How to create a new blank data entry page
  • How to add custom component that renders HTML content
  • How to add a button that calls a REST service
  • How to pass a parameter to the JavaScript custom code
  • How to set a page to be the default page of the app
  • How to stage your application for external testing

It seems that right now you are restricted to accessing REST services that are secured over HTTPS protocol (which is a good thing).

Note that you of course don't have to stage the app to see it run, you can just go into live mode, or run it to see it working. I just wanted to make sure I have a demo out there that shows how staging works.

The JavaScript snippet I'm using in the video is: 

$.getJSON("https://api.github.com/users/"+ +"/repos", function(result){

$.each(result, function(i, field){

$('[name="myOutput"]').append(field.name + " ");

});

        });

resolve(); 

If you'll actually add a

$('[name="results"]').empty(); 

as the first link, it will clear the field for you each time you re-press the button. 

Viewing all 200 articles
Browse latest View live


<script src="https://jsc.adskeeper.com/r/s/rssing.com.1596347.js" async> </script>